Showing posts with label project. Show all posts

Monday, April 4, 2011

Project Simplify - Pantry

Arriving a few days behind on the Project Simplify post.  Last week's focus was the pantry and refrigerator.  Although everyone wants more storage space, I should be thankful that our home has any form of pantry, as small as it seems.  The small size demands organizing attention at least once every four months.  I used a mix of purchased containers and free re-purposed items to help with the organization.  My plan of attack was to remove items from two shelves at a time and replace items in like groups.  If I decided not to put it back in it's original spot on the shelf the item just hung out on the counter until enough "like" items joined it!
Starting at the top:


This area was an even bigger mess before!  Things tend to get randomly tossed and land where they may on the top (hard to  reach) shelves.  I added an empty Girl Scout Cookie box to contain the cups and create another shelf.  The red plastic basket holds paper napkins (many left over from birthday parties) and plastic utensils.  We don't use many paper products in our house but it is convenient to have a stash for picnics or party extras.


I've always used the wire shelf racks in my pantry and cabinets.  They are a "must have" in order to make the most of your space. As you can see, baking items are grouped together, cans and jars together. The middle shelf holds mostly drinks and vitamins.  Tea packets and Cocoa Mix are in the white Tupperware container and vitamin packets and tincture bottles are in the blue box.  The bottom shelf holds items that the children use often, cereal and snacks.  The clear modular press and lock containers are from Target.  They were a little on the expensive side but well worth it.


On the opposite side:  Baking Mixes, pasta and grains are grouped together.  The Tupperware Modular boxes hold nuts and dry salad toppings, small bags of grains,  soup or spice packets.  As I look at this photo I know that labels would help but it seems that the contents of the boxes often change so I've never committed to labels!    The bottom shelf isn't very visible but holds a box of trash bags and an under-shelf rack with zip-loc bags, foil, etc.


All good deeds are rewarded.  Well, not all, but cleaning out the pantry was rewarded with this yummy chocolate bar hiding behind the Cream of Wheat! Don't mind if I do.
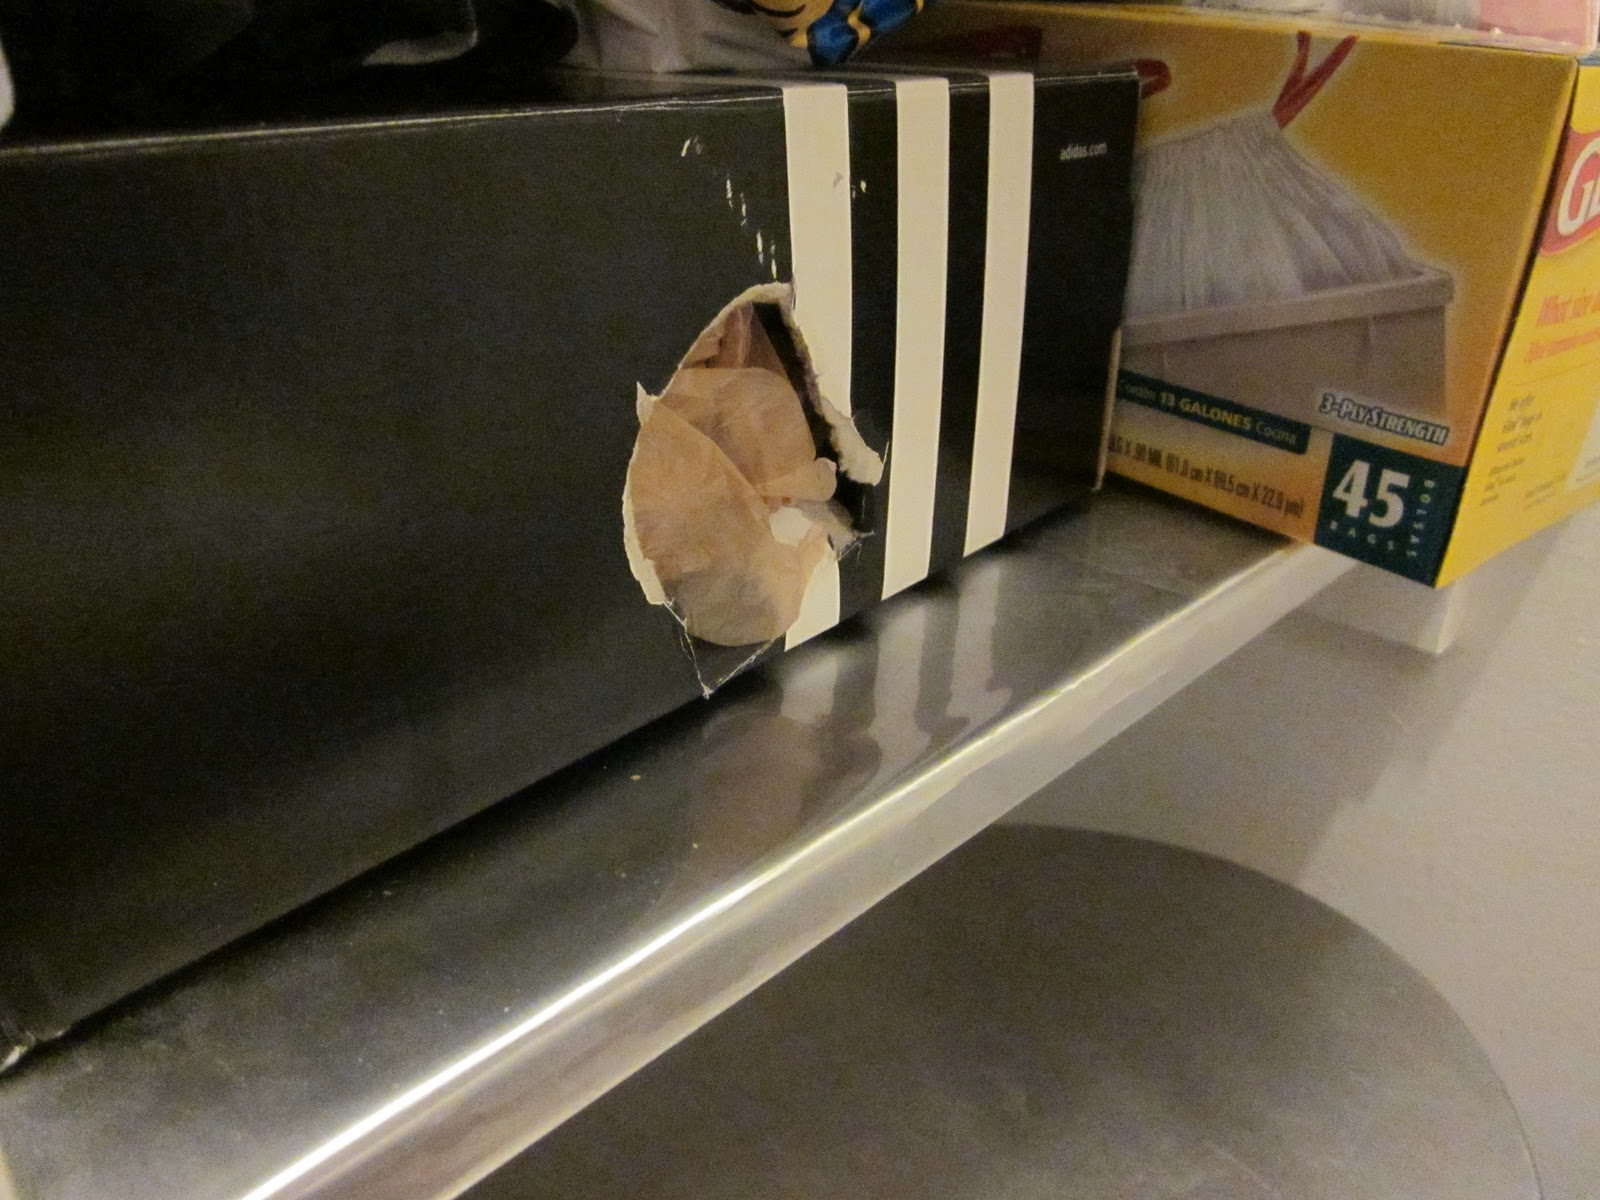

What is that hideous thing above?  I know it's not pretty but is was quick, practical and free!  We re-use plastic grocery bags for trash can liners and picking up dog poop.  You do too, right? Instead of having a mass of bags falling off the shelf I cut a hole in a shoe box and can easily stuff bags in or pull them out when needed.


Gathered the random messy stack of grocery and gift bags and put them into one reusable grocery bag. Not great, but better.


These stacking recycling bins fit right under the bottom shelf.  One for paper, one for glass and plastic.  Love that you can access the bottom bin(s) through the hinged lid.  From Ikea. Yes, I know that's a random bag of dog food that needs a new home.  The opposite side of the pantry floor houses the lidded trash can.  I make myself be okay with trash in the pantry by reminding myself it's covered.  Is trash in the pantry weird? Best we can do at the moment.

This concludes the pantry tour.  Keeping it real, folks.  Don't forget to check in with Simple Mom for the latest Project: Simplify info!

Saturday, March 26, 2011

Breakfast Nook and Kid Art

Today we'll just pretend that I'm not a Project Simplify flunkie and focus on something I've actually completed, Yea!  I've turned our breakfast nook into a little gallery for the kids' artwork.  It's a grouping of mostly abstract painting with some crayon and collage thrown into the mix.


 The black frames unify the different artwork which I think is helpful since there isn't really a color scheme going on.  The breakfast nook or kitchen is often a fairly casual space in a home.  It seems like a logical place to display kids' artwork.  It's displayed and obviously valued by the family but doesn't overtake the decor if you prefer to have a formal living room free of kiddie stuff.


Most of these frames were purchased at IKEA or Target fairly inexpensively.  I've also posted previously about thrift store frames.  They are cheap, abundant and easily freshened up with spray paint.  


This piece above is hung in a hallway.


This robot graces a kid's room corner.  It's hung a little lower than normal so little people don't have to crane their necks to enjoy it.

Although I'm not very good at tossing artwork, framing a couple of pieces each year makes it easier to let  some of the drawings and paintings make their way to the recycle center.

Saturday, March 19, 2011

Houston, We Have a Problem

So...Simple Mom's "hot spot" for the Spring Challenge Project: Simplify was the paper pile.   "The" paper pile implies one paper pile.  People have one? I have multiple paper piles, stashed everywhere.  Stashed in the storage closet because I had to clean up quickly.  Stashed in a paper bag because my paper basket was over flowing.  Stashed under my bed because I brought a pile in from the car and didn't have time to deal with it...

This is not a five day task for me!  Since the project was announced 6 days ago I've made decent progress. It will be another 3 or 4 days before I'm willing to post "after" pictures.  Here are a few pictures of the train wreck as it was on March 14:


Above:  A Stack spread out of the dining room table for sorting


Another stack shamefully hidden in the basement storage closet


Yet another stack.  Once in the bottom of my closet, now stashed in location #2 awaiting judgement


A fab file cabinet.  Full of paper...clearly more paper than one household needs to keep.

Oh boy...

Friday, March 11, 2011

Project Simplify: Closet

Closet, done! As I mentioned in the previous post, I've committed to joining "Project Simplify" with Simple Mom.  Although I didn't devote enough time to tackle my dresser drawers, my closet (my half at least) is complete and looks much better. Here's the brief run-down with photos!

Before


After


I must say I was relieved when I saw Tsh's post this morning.  Her closet re-do wasn't done by Martha Stewart and a magazine staff, it was a "real life re-do".  I didn't spend any money or make this a 12 hour endeavor.  I feel better when I open the closet door and know I actually want to spend a couple of hours and go through my dresser also.  A couple more photos below:

The hamper in the above shot was once out in our room beside my husband's chest of drawers.  It's not hideous but I'm glad to have the space to keep this in the closet!

I'd been hanging onto this skirt for years.  It's of good quality but I'm simply not going to wear a skirt that goes down to the floor.  bye bye.


These two photos above show what went to the thrift store.  Only 12 items total.  Hopefully I can say goodbye to more once I hit the dresser.

The above demonstrates my main housekeeping problem - STASHING! A bunch of junk that had no business being in the closet.

Thank you Simple Mom!  Wonder what's on the agenda for next week?

Tuesday, February 8, 2011

Easy and Inexpensive Large Inspiration Board

This is a long post, so if you're looking for Thrift Share Monday you can click on over! Thanks for stopping by.

I'll go ahead and admit that this is not a magazine worthy, top-quality project.  Maybe if I was a better photographer I could pull off a more "finished" look but I decided to share anyway.  I'm posting it because if you're tight on time and your decorating budget is nil, this is actually still doable.  A large board can help cut down on clutter while at the same time bringing impact to an empty wall or focus to a room.

This project can translate to an office, a kid's room, a family room, etc.  I'll go through the process with photos then list the price and materials breakdown at the end.

1. Take a look at your wall space and decide on the approximate size you'd like your board.  I had 7 1/2 feet of empty wall space with 8 ft. ceilings and my board is about 40 in. square.
2.  Lay out your foam board. Depending on your desired "final" size, you may have one solid piece of board or 3 or 4 pieces.  As you see below I used 2  20"x30" boards and then cut another board in half lengthwise. I used one 10"x30" piece (top right) and then made another cut for the 10"x10" piece (top left).  Foam board is easily cut with an exacto knife or straight blade (or frankly, a sharp knife from the kitchen).


Clearly, a solid rectangular piece is easier but I wanted a square! My Hobby Lobby also sold a 3'x4' piece that would work perfectly.
3.  If you have multiple pieces simply square them up and then use duct tape to join into a solid piece.


4.  Lay out your chosen fabric. I used burlap. (Call your craft or fabric store first to be sure they carry burlap). Burlap gives some texture to your space and doesn't compete with anything you may add to your board.  As a bonus it's also inexpensive (about $3 a yard in my neck of the woods).


5.  Just place the fabric on top (or underneath) of your board and cut an extra 2 inches around the perimeter. 


6.  With your fabric on the floor and the solid white side of your board against the fabric, begin to tape your fabric to the board.  I recommend starting at the opposite centers to be sure your fabric is smooth and even over the board. For example, if your board was a clock you would tape at 12 and 6 o'clock, then at 3 and 9 o'clock.  Work outward from those points.


7.  As you approach the corners, fold the fabric over the corner and tape (basically on the diagonal). Then, pull the fabric snug to those edges and tape, making a neat fold on the back of your board.


I warned you this method wasn't anything fancy!  If it makes you feel better you can add a long piece of tape to the back edges to make it look slightly more finished.  Honestly, who cares? This will be hidden against the wall and no one will ever know that the back looks sloppy.


I used Command Hanging Strips for this board.  Three strips can hold 9 lbs and my board isn't anywhere near that heavy.  It solves the problem of rigging up a wire on foamboard (is that possible?) and saves your wall from nail holes.

8.  Attach Command strips to the back of your board. Here's a little trick: cut a single Command strip in half to make a gripping set. This way you can use one pack of strips and spread them out on your board for better coverage.


9.  Make pencil marks on your wall to ensure you are able to place your board exactly where you want it!

10.  Remove the cover from your Command "pairs" and then press your board onto your wall space.  I recommend another set of hands and eyes to help with this step, especially if you have a large board.  Be sure to apply pressure for several seconds at each attachment point.


Materials:

3 pieces of 20x30" foamboard - $4.50
1 1/3 yds burlap                      - $4.00
duct tape                                 - $0.50
Command Strips                     - $4.00

Tools:

Exacto Knife
pencil
measuring tape

Hindsight's 20/20:  I'm planning on making another board this week and this time I'll use the thick foam board (1/2") I saw at my craft store.  A store bought bulletin board can also be covered with fabric, but an extra large cork bulletin board is a good deal more expensive than the foam board version.


Thursday, January 13, 2011

Mirror Makeover

Without fail, you can walk into any thrift store and find a small framed mirror.  The frames are often beat-up or too cheap to actually hang as-is but they're perfect for an easy makeover.  I buy these mirrors every now and then and have a collection of eight.

I'm hanging a few things on the wall of one of the kids' rooms and I've prepped four of the mirrors to hang in a cluster.  What kid doesn't love staring at themselves and making goofy faces?

The project:


I'll confess that I tend to take the lazy route for most home projects.  The thought of taping all four mirrors and then peeling tape and scrubbing after spraypainting seemed a little tedious.  So...I folded and creased newspaper and stuck it between the frame and mirror at the corners.  I layered a little more to be sure the mirror was completely covered before spraying.  After covering the first mirror I realized some of the thicker advertising inserts would work even better.  Scrap cardstock? Perfect. 


I sprayed one coat of the Rust-oleum product seen above and let that dry while I did something more exciting (laundry!). The second coat seemed to cover the frames thoroughly but when I got a good look in the bright sunlight I hit a couple of areas a third time.


These are hung on the wall and being enjoyed.  I'll snap a few shots and post the results....someday.